

High Gloss Piano Repair with Polyester
- James
- Oct 8, 2018
- 2 min read
You have a Grand Piano that cost you $75,000. What to do when somebody damages it during transport. Buy a new one? Probably not, but we have researched and developed a product that provides a finish as close as 99% done.
This product is a special polyester kit designed for black pianos and can be tinted to other colours using dyes. Essentially the product hardens to the strength or even stronger than the piano with the structure for sanding and polishing to high gloss if needed.
Step 1.
Products Required: Edge Planer, Wet Sandpaper & Touch up dye
Remove all loose particles. Cut edges at an angle and slightly sand with 800 grit Sandpaper. Clean surface. Light-appearing spots should be pre-dyed with black Touch-Up Dye. You must pre dye the spot especially when white ringing occurs to hide on such a black surface.

Step 2.
Products Required: Mixing Spatula & Polyester Filler Lacquer
You must first follow the measurements on the mixing cup a pour the right amount of lacquer and dye. Once dye is mixed in mix hardener in aswell. Dip wooden spatula into the mixed lacquer and ‘dab’ drops into the damage area. In case of a large damage, just pour lacquer directly out of the cup. Generously overfill the damage area – the matt paraffin coat which develops must not be touched. Hardening time at least 60 minutes. If lacquer has been dyed, a curing time of 12-24 hours is recommended, this also applies to repairs to piano parts.

Step 3.
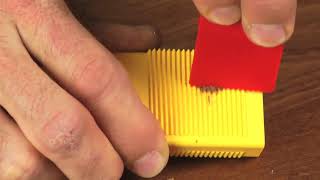
Products Required: Metal Planner and Special Scrapper
Gently strip off polyester using the Special Scraper or the Metal Planer. You must bring the repaired surface to almost flush with the surrounding surface.

Step 4.
Products Required: Wet sand paper & Micro sanding paper
Step 4.
Sand surface using Sanding Liquid, Sandpaper and Micro Sanding Paper, beginning with the lowest grit. Clean surface after every sanding process. You must ensure that every stage of sanding is perfect otherwise the higher gloss sheens are harder to achieve perfect finish.

Step 5.
Products Required: Polishing Paste & Felt Fat
Apply Polishing Paste 'fine' to the Felt Pad and polish off fine sanding dullness. Use sufficient Polishing Paste - do not allow paste to dry during polishing process as lumps may develop and cause abrasions. Now and then wipe with a Special Cloth to check result.

Tips & Tricks: Sanding is definitely the most important part of the process. for high gloss finishes you need to sand off very thoroughly for the best finish. You can also use a polishing machine tool for quickly method of finishing the sheen level.


Comments