

Repairing Deep Holes in Parquetry
- Oct 25, 2018
- 2 min read
Recently we just completed a large day of training with boutique floor specialist and they love parquetry. We do to as it looks awesome!
Repairing parquetry isn't too complicated, just a few steps to repairing the damages like new. In this step by step guide for repairing timber parquetry flooring, we will show you how to fix under filling of the wax. Sometimes you will repair and fix all the graining a notice that the there are some small holes that needs to be filled for perfect leveling.
Step 1. Cleaning
Products Needed: Eco Cleaner
Use for the gentle cleaning of décor and plastic surfaces. Removes most common household soilings. Also suitable for the basic cleaning of wood and UPVC windows.

Step 2. Pre Dyeing
Products Needed: Colour Touch-Up Boxv
Pre-colour damage in the substrate with Colour Touch-Up and the Red Marten Brush. By using the lightest colour you can find in the timber this will allow for the none of the raw timber colours to come through.

Step 3. Filling
Products Needed: Hardwax PLUS & Hot Knife
Choose several colour shades of Hard Wax PLUS corresponding to the surface (light/medium/dark) and hold wax sticks in turns to the hot tip of the Hot Knife. Let colour wax mixture flow into the damage in the direction of the grain.

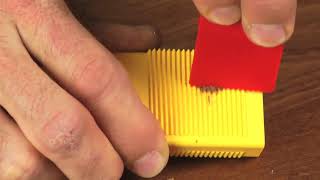
Step 4. Leveling
Products Required: Special Fillers Applicator & Wire Wool
Remove surplus wax with the Special Fillers Applicator. Note: Sharp grooves on the flat surface, round grooves at edges Shiny spots can be reduced either by using Wire Wool or Sanding Pad, coarse.

Step 5. Restoring Graining
Products Needed: Furniture Lacquer PLUS, Special Filler Applicator & Colour Touch-UP Box
Make an intermediate sealing by misting with Furniture Lacquer PLUS from a distance of 30-40 cm – do not spray too wet. Restore grain pattern while scratching with the Special Scraper and applying Colour Touch-Up with the Red Marten Brush in the depth.

Step 6. Re-fill for leveling
Products Needed: Hardwax PLUS Transparent, Hot Knife & Special Filler Applicator
Fill grain with Transparent Hard Wax PLUS and remove surplus wax with the Special Filler Applicator.

Step 7. Sealing
Products Needed: Furniture Lacquer PLUS
Seal filled damage by misting with Furniture Lacquer PLUS from a distance of 30-40 cm – do not spray too wet. Spray 2-6 light coats if necessary.


Comments