top of page

This Week's Top Story About Repair

Caravan Wall Cracks Appearing


Over the last 6 months there had been an large amount of caravans popping up on the east coast of Australia with damages occurring on the interior walls. We had been in contact with one manufacture tasked to solve this problem.


So some here's context to make some sense of the problem.


The manufactures were having after sales problems with their caravans interior wall panels. Cracks were popping up left, right and center. There is no real reason for the cracks occurring. Maybe it's to do with weather moving between hot and cold temperatures, or possibly the shift of the chassis has caused the cracks.


But no!


Unfortunately the issue was not solved from manufacturing point and was left to Konig and our team to find out how to fix the cracked walls.


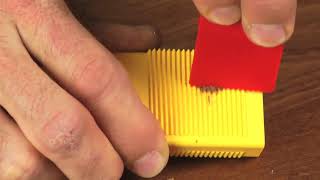
Konig Australia worked with one of the contractors in the area of the damaged caravan and came up with a solution. The solution was to fill the crack with a soft wax then match the texture of the wall and match the colour for a finish that looked brand new.


Here is an instructional step by step process for how we repaired the caravan walls.


Instructions:

Step 1. Caravan Protection.

Make sure you lay down sheets over most of the caravan near the cracks to protect from over spray. Use drop sheets and masking tape as well.

Step 2. Clean the damage.

Clean the damage from oils caused by hands and or dirt in the damage.

Step 3. Prepare the crack.

Sometimes the crack might be to small for any material to get inside. Using the Special Scrapper, scrap out from the middle of the crack (about 3mm). Be careful and go slow. Try not to damage the surrounding area.

Step 4. Filling Crack.

Using the Applicator and the Soft Wax, push the wax into the crack and slightly overfill.

Step 5. Levelling Off. Level off the wax with the Applicator or the Metal Planer.

Taking the Metal Planer out of the black magnetic case works best. Follow the direction of the blade and take off small amounts of wax at a time. If the applicator is better suited use this instead.

Step 6. Seal with Lacquer.

We recommend sealing the damage first before continuing forward with the processes. Use the Furniture Lacquer PLUS with the sheen needed.

Step 7. Match the Colour.

Use the PF Covering Lacquer to spray lightly over the damage around 20-30cm away. We have been using 9003 the most in caravan repairs but you might need to test a small spot not near the damage if the colours not correct.

Step 8. Texture Spray.

Use the Effect Lacquer Fine Pearl Texture spray to replicate the texture on the surface. Spray lightly over the PF Covering Lacquer once dry.

Step 9. Repeat the spraying process.

Spray the PF Covering Lacquer of choice and wait to dry, spray the Effect Lacquer Fine Pearl Texture Spray and wait to dry and then finally spray the Lacquer of choice (matt to gloss) and wait to dry.

Repeat this process until you are happy with the result of the repair. Also, the PF Covering Lacquer takes a few coats to hide the cracks.


Featured Posts
Recent Posts
Archive
Follow Us
  • Instagram Social Icon
  • YouTube
  • Facebook Basic Square
  • Twitter Basic Square
  • Google+ Basic Square
bottom of page
google-site-verification=LCuDLCbRSkPSIawu3dML4_QhJyhizU7YeoJXjkcm1vg