FIX A CHIPPED FLOOR TILE (learn how to repair it with step by step instructions)
Damaged a tile or drilled the wrong hole?
Konig Australia Blog | Professional Repair Kits for Tiles & Timber Surfaces. What you might be searching for: floor tile repair, chipped tiles, drill holes in tiles, ceramic tile repair, fix cracked tile, repair kitchen floor tiles, patching grout tile floor, how to fix tiles, tile repair kit bunnings, tile filler and fix a tile chip.
Well it has come to an end finally. We provide high end repair kits allowing you to repair all the damages you may have accidentally caused or if you customer needs repairs they or their family has made.
Follow these Steps to ensure the best quality repair capable for our products:
Step 1. Preparation
The area to be repaired must be cleaned, dried and free of grease. Remove any loose or sticking out parts of tile prior to the repair. If the damage is less than 2 mm, we recommend drilling the hole deeper. By having more surface area you'll provide the wax the area it needs to adhere to the tile.
Step 2. Melting
Activate the melter for 30 seconds and touch the melter tip into the Ceramic Filler stick matching your colour of tile. Best tip: use two 3 colours for the base colour and add small dot on top in blending.
Step 3. Filling
Apply this moltern filler mixture over and onto the damage area using the tip as a shovel, as the hard wax can become very liquid like. Over fill the area slightly. The wax is completely dry with in seconds and warm to touch. After 1 minute it is completely hardened.
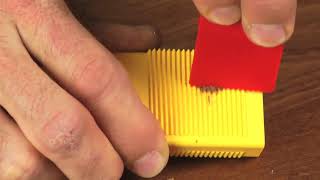
Step 4. Levelling
Remove the excess filler and use the serated teeth on the Applicator. You can also use the front flat edge of the applicator in a fast motion to take wax away.
Step 5. Adjust Colour
Add small dots on top of the damge to replicate the different colours in the tile and use the curved edge to blend in.
Step 6. Degreasing
Use the grey pad to degrease the damage and the surrounding area with light pressure.
Step. 7 Apply the Sealing Pen
Use a the cloth and pre squeeze some sealer onto the cloth to allow the tip to become wet. Adjust amount on tip and apply to the damage. Use the Green and white pad to adjust for High gloss or Matt finish.